Textbook & Attributes Selection (two-step process)
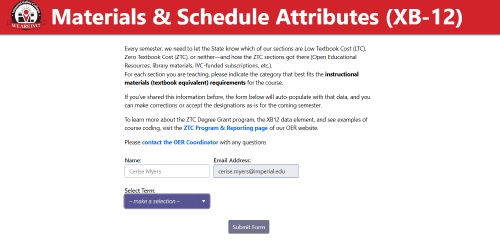
STEP 1: Materials & Schedule Attributes (XB-12) Form
The Materials & Schedule Attributes Form collects information required by the state, as well as populates the schedule with
the correct attribute (Zero Textbook Cost, Low Textbook Cost, or neither) for each
section. Each section must be updated for each term, but the new form means that it’s
easy to roll over past attributes.
The form contains a link to the ZTC Program & Reporting page of the OER website, which explains the XB12 process and codes and gives examples
of applying them. It also links to IVC's ZTC & LTC guidelines.
Completing the form
- Log in. If you’re not already logged in, the link to the form will take you to IVC’s Single
Sign-On (SSO) page so that you can do so. Once you’re logged in, the form will show
your own name and email address.
-
Select the appropriate term(s). Use the pull-down menu to click on the term you wish to update. Only courses that
have been assigned to you in Banner for that term will populate the list. If sections
are missing, contact your Chair.
-
Roll attributes over or make updates.
-
If you’ve entered XB-12 information in the past, those designations will appear beside
any courses you’re teaching for the selected semester. If the information is accurate,
select the green “Roll Over As-Is” button. Click the boxes to confirm your selection
and click “Submit Form.”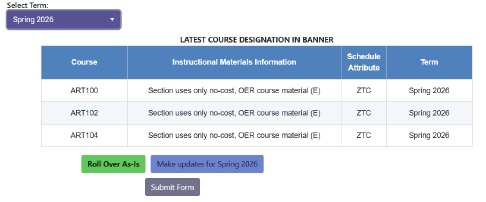
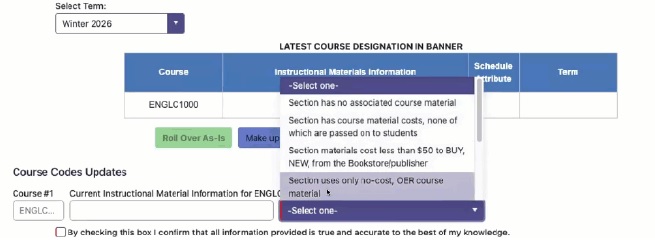
- If you haven’t entered attributes, or if those attributes have changed, select “Make
updates” and use the pull-down menu beside each course to select the correct attribute.
When attributes have been selected for all courses, check the box to confirm and click
“Submit Form.”
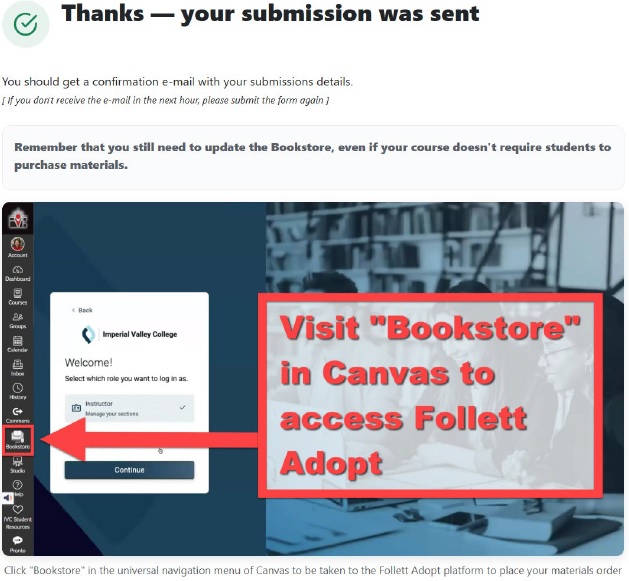
- Receive confirmation. The confirmation screen confirms that your submission has been sent. An email confirming
your selections will be delivered shortly thereafter.
Step 2: Bookstore selections visa Follett Adopt
Even if you’re using all OER materials or your course doesn’t require a textbook,
you must confirm your information with the (virtual) Bookstore. It is crucial (and
legally mandated) that students are aware of all costs associated with a section prior
to registration, making full and accurate completion of this step essential.
Using Follett Adopt
- Log in to Canvas and enter the Adopt platform. In Canvas (to log in, enter your credentials in the SSO and then select “Canvas”),
click on the “Bookstore” link in the far left (universal) navigation bar. The Adopt
platform will open in a new tab and welcome you by name. Select the “instructor” role
and click the “Continue” button.”
- Launch (or skip) the Adopt virtual tour. A pop-up window will welcome you to Adopt, and you may either click through the
tour or skip it.

- Confirm you’re in Classic view. If you’re not already, click “Switch to Classic” and click to confirm that change
in the window that pops up.

- Make or update selections. Depending on whether previous Bookstore information rolled over, you may see materials
listed for your courses. Please double-check these, and update as necessary!
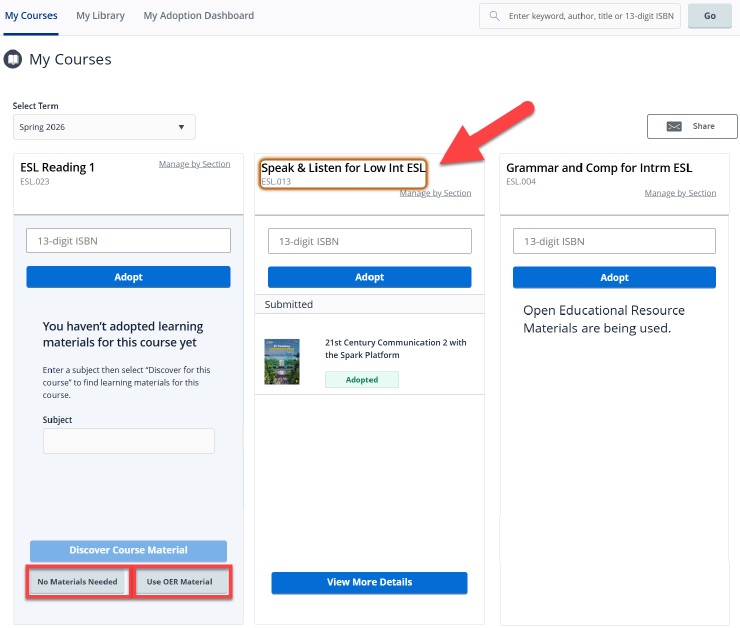
- If your course uses OER or doesn’t require material, click the appropriate button (highlighted in red boxes
above) and confirm your selection.
- For courses with adoptions, click the course title to see details about the adopted materials, including pricing;
to edit usage (required/recommended); to view other features; or to remove.

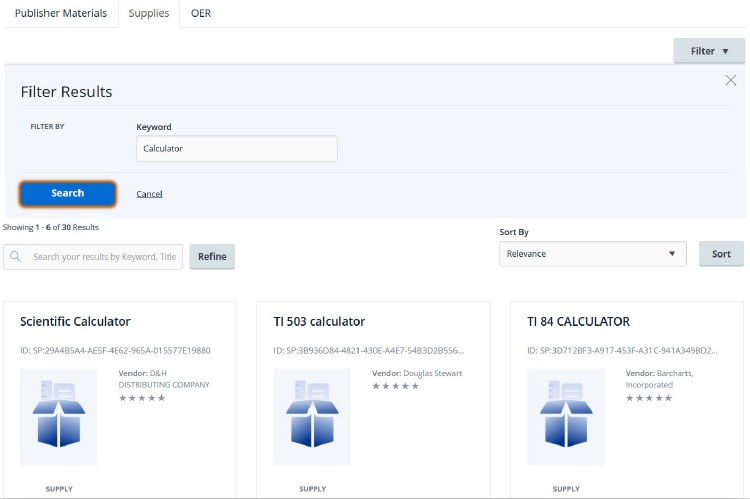
- To add material, search from the “My Courses” view directly, using ISBN, or click the title of any
course (including ones using OER) and click the “Discover for this course” button
to search for and add materials, OER, or supplies.

Notes:
- Be sure you’ve listed all required and recommended materials, including:
- Any required textbooks, lab manuals, homework systems, workbooks, and/or novels
- Required supplies, such as lab goggles, graphic calculators, or software
- Depending on the material you selected, it may show as “pending,” rather than adopted.
Check back later for Bookstore confirmation or contact Follett.
- For help, click “Message Center” at the top of the screen, and then “Contact Campus Store.”